
Getting Started
Contents
2. Getting Started#
Outcomes
Know what the Jupyter Notebook is
Be able to start JupyterLab in the chosen environment (cloud or personal computer)
Be able to open a Jupyter notebook in JupyterLab
Know Jupyter Notebook basics: cell modes, editing/evaluating cells
2.1. Computing Environment#
These materials are meant to be interacted with, not passively read.
To help you do this, we use a software called Jupyter and files known as Jupyter notebooks which allow us to bundle a mixture of text, code, and code output together.
In fact, right now you are either directly reading a Jupyter notebook or a website that was generated from a Jupyter notebook.
2.1.1. Jupyter#
We will refer to two components of Jupyter’s software: JupyterLab and Jupyter Notebook.
JupyterLab
JupyterLab is a software that runs in your browser and allows you to do a variety of things such as: edit text, view files, and (most importantly) work with Jupyter notebooks.
Jupyter Notebook
This is the actual file that allows you to mix code and text.
The content inside a Jupyter notebook is organized into cells.
Cells can have inputs and outputs.
There are two main types of cells:
Markdown cells
Inputs are written in markdown and can contain formatted text, images, equations, and more.
Outputs are rendered in place of the input when the cell is executed.
Code cells
Inputs Contain Python code (or code in another language).
Outputs are placed below the input cell and contain the results generated when the input code is executed.
Below is an image that demonstrates what a Jupyter Notebook looks like:
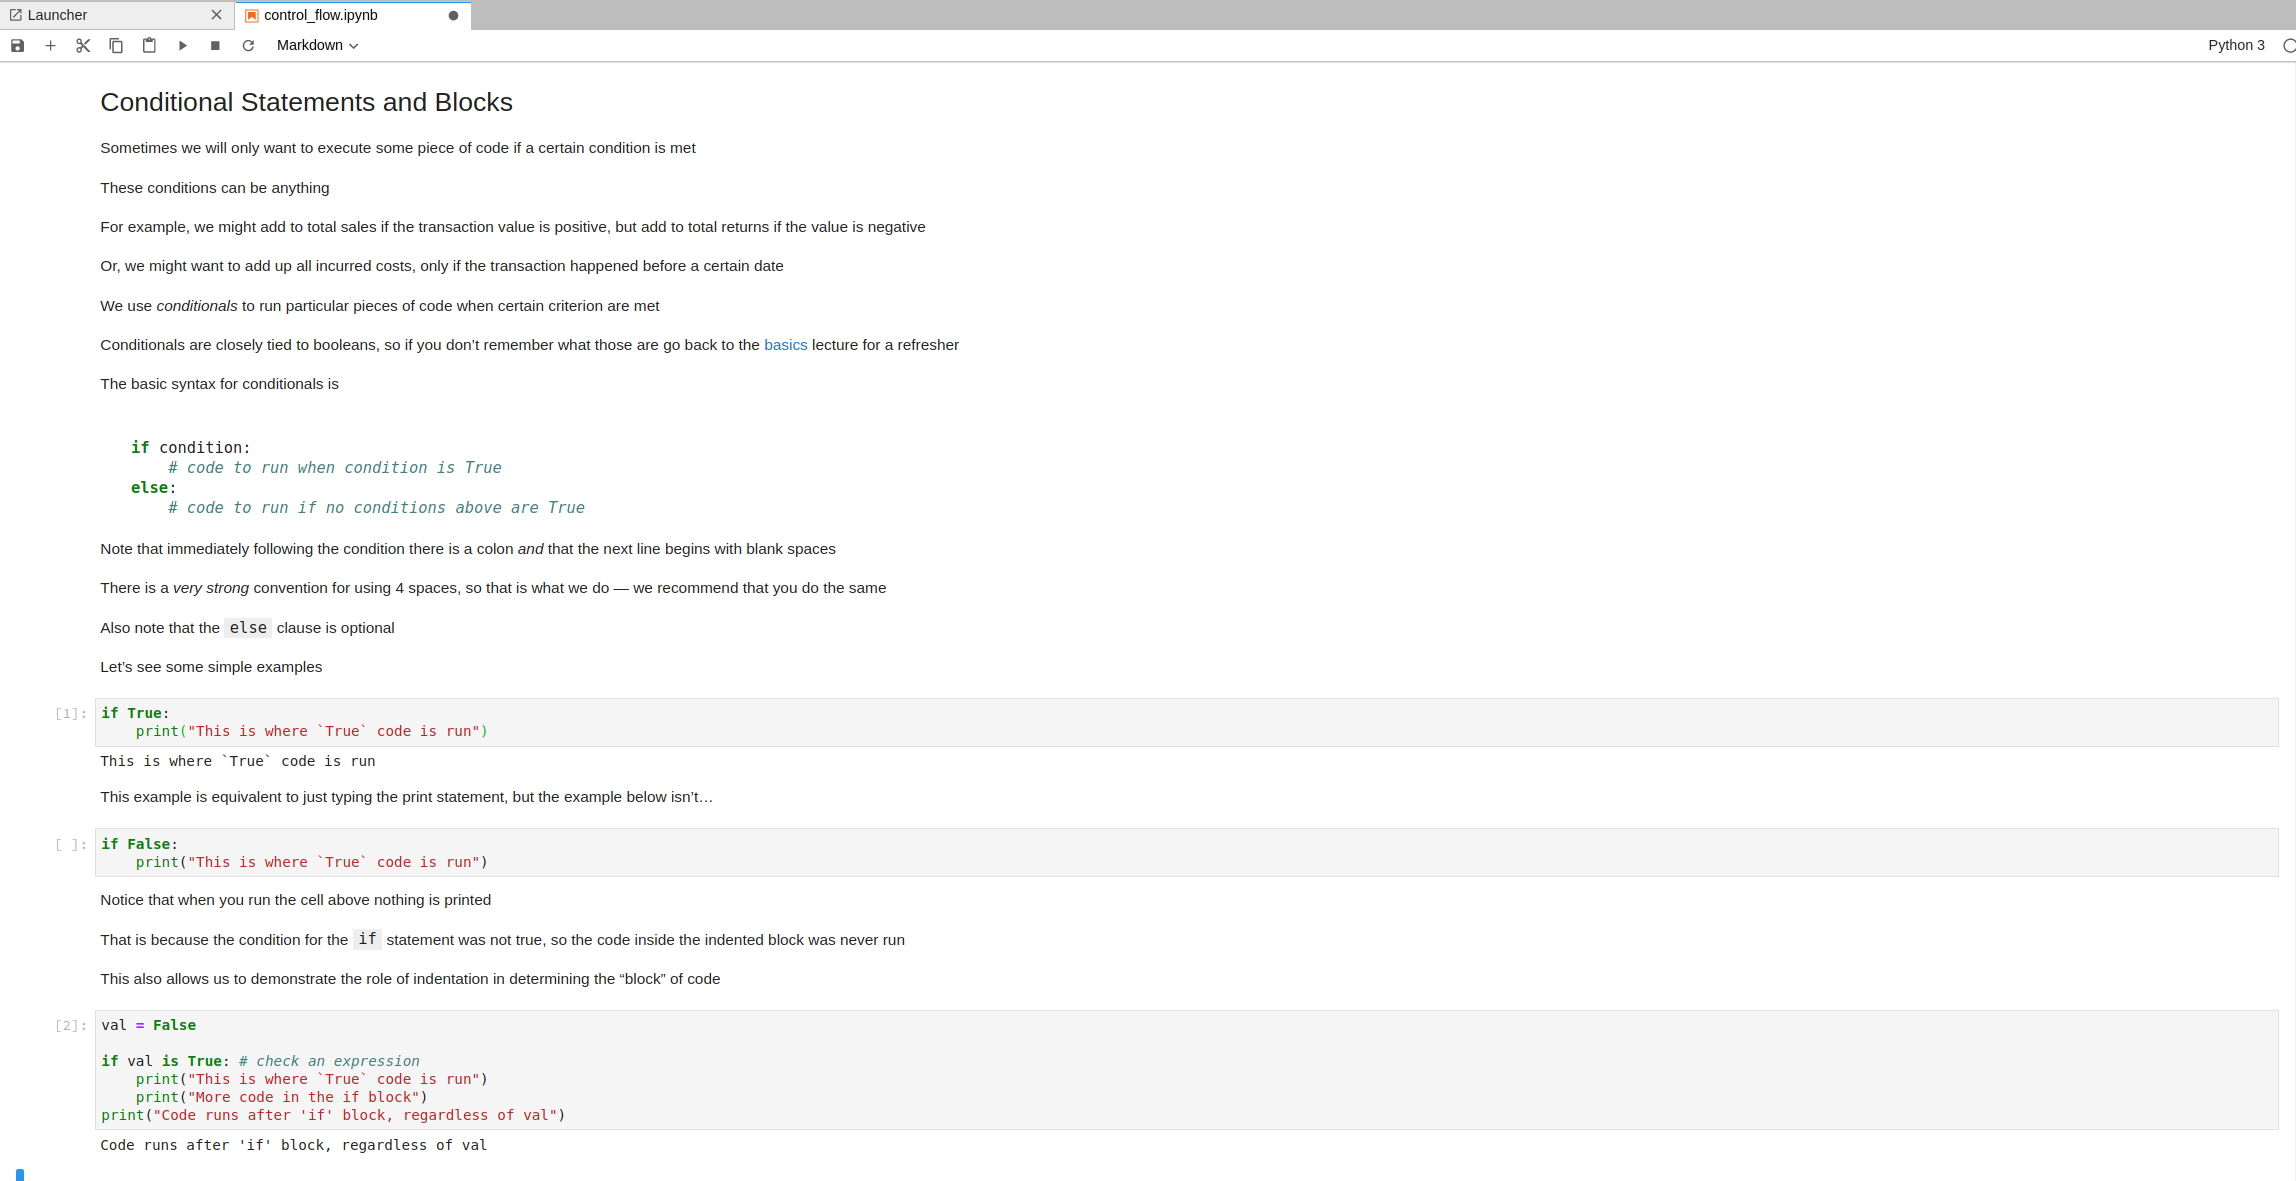
Notice a few things about this image:
Inputs to code cells have a
[ ]:to the left of them and have a darker background than the surrounding area.Code cells that have not yet been executed do not have a number in the
[ ]:box and have no corresponding output.Executed code cells have a
[#]:to the left of them (where#is a number) and, depending on what the code in that cell does, may or may not have an output.Executed markdown cells are displayed as formatted text, rather than the input/output structure.
Being able to include both text and code allows us to do interesting computations and explain them.
This combination has caused leading companies like Netflix and Bloomberg to adopt Jupyter as a tool of choice for data analytics and reporting.
We will follow in their path and leverage Jupyter Notebook throughout these materials.
2.1.2. Google Colab#
We will be using the Free google Colab plataform (as you use in GBA-Stats)
This is cloud based software that allow us to run jupyter notebooks without having to install any softward in your machine
But you should feel free to install locally in your machine– BUT YOU DON’T NEED TO DO IT.
2.1.3. Running the Lectures#
The interactivity of a Jupyter notebook is driven by two main components:
Server that is responsible for executing code
GUI that runs in your web browser (what we learned above above)
We will edit the content of the notebook and request code execution from the web GUI.
The Jupyter application will then ask the server to execute the code and send the results back to the GUI.
You can choose to interact with these materials from two server environments:
The cloud (we will use google Colab)
Your own computer
Cloud Computing
A cloud solution provides a pre-installed environment for you.
As long as you have an internet connection, you will be able to interact with the lectures through a few cloud computing options.
We try to ensure that you’ll be able to run any of the lectures from each of the cloud options, but because these services are hosted by others, we cannot provide any guarantees.
Using the cloud is a great option if
You aren’t sure whether you’d like to learn these skills and just want to test the lectures out without any additional commitment.
You are away from your typical work station and would like to spend a few minutes interacting with our lectures — we often take this route with our colleagues over coffee (or other conversation stimulants).
If you would like to work on these lectures from the cloud, please read the instructions for getting set up with cloud computing. That is my recommendation for most of you.
Local Installation
With a local installation, you will install the required software onto your own computer.
This is typically a straightforward task and, once you have done this, you will be able to run the lecture code (and any other code you write for your own projects!) on your personal computer.
If you are confident that these are skills you would like to acquire and are willing to have the software installed on your computer, then this is a great option.
If you would like to work from a local installation, please read the instructions in local installation instructions page.
These instructions will walk you through the installation procedure, help with some basic setup, and show you how to open JupyterLab.
Once you have completed installing the software, return to this page and proceed with the Jupyter Basics section.
2.1.4. Jupyter Basics#
Now that you can open a JupyterLab instance on the cloud or on your own computer, we can talk about how you should use them.
Note, not all of this will apply if you are using the Google Colab cloud server since they are running a modified version of Jupyter. For more help on using Colab, see their help menu.
Editing Jupyter Notebooks
Once you have opened a particular notebook, you can be in one of two “edit modes”.
Command mode: This mode is for making high level changes to the notebook itself. For example changing the order of cells, creating a new cell, etc…
You know you’re in command mode when a blue sidebar appears on the left of the cell.
Pressing keys tells Jupyter Notebook to run commands. For example,
aadds a new cell above the current cell,badds one below the current cell, anddddeletes the current cell.up arrow (or
k) changes the selected cell to the cell above the current one and down arrow (orj) changes to the cell below.
Edit mode: Used when editing the content inside of cells.
When in edit mode, the selected cell displays a green sidebar on left.
Can edit the content of a cell.
Some useful commands:
To go from command mode to edit mode, press enter or double click the mouse
Go from edit mode to command mode by pressing escape
You can evaluate a cell by pressing
Shift + Enter(meaningShiftandEnterat the same time)
Advanced Usage and Getting Help
For more help with JupyterLab and Jupyter Notebook, see the user guides:
2.2. Exercises#
In the code cell below (notice the [ ]: to the left) type a quote ("), your name,
then another quote (") and evaluate the cell
# code here!